When you click a button on a webpage, have you ever wondered how JavaScript knows which element to target first the button itself, its parent, or the entire document? This happens because of something called event propagation. And inside event propagation, two key concepts rule the game: event bubbling and event capturing.
If you’re learning JavaScript, understanding these two is a must. They explain how events travel through the DOM (Document Object Model) and how you can control them to build interactive, efficient applications. In this blog, we’ll simplify event bubbling and capturing with practical examples so you can actually apply them in your projects.
What is Event Propagation?
Before diving into bubbling and capturing, let’s talk about event propagation itself.
When you perform an action like clicking a button, the event doesn’t just stay there. It moves through different layers of the DOM from the root (document) down to the target element and back. This flow is called event propagation.
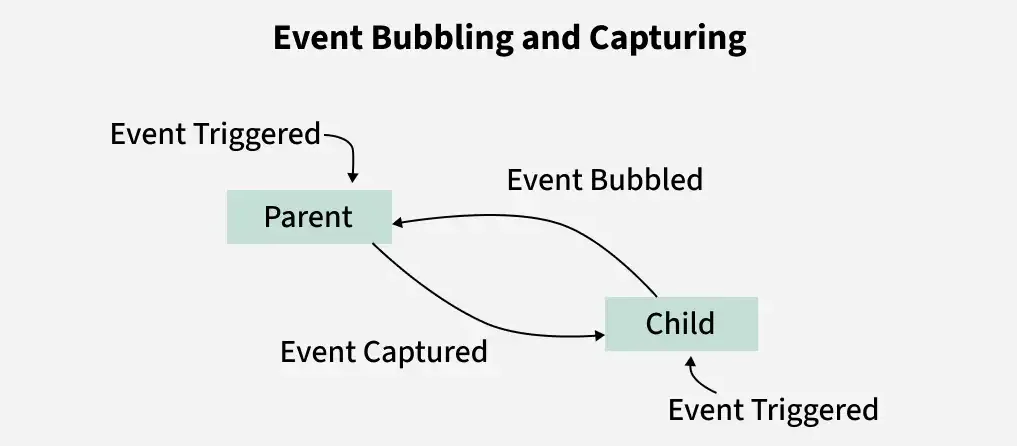
Propagation happens in three phases:
1. Capturing Phase → Event moves from the root down to the target element.
2. Target Phase → Event reaches the actual element you interacted with.
3. Bubbling Phase → Event moves back from the target element up to the root.
Now, let’s focus on the first and last — capturing and bubbling.
Event Capturing in JavaScript
Event capturing means the event starts from the top (document/root) and trickles down to the target element. Think of it as water dripping from the top of a tree to its leaves.
By default, JavaScript doesn’t use capturing unless you explicitly enable it. You do that by passing a third parameter as true in addEventListener().
Notice how the child event handler executes first, then the parent’s. That’s bubbling in action.
Why Does This Matter?
At first, this might feel like just a technical detail, but it actually has big implications in real-world projects.
Event bubbling is extremely useful when you want to handle many similar events with one listener (a technique called event delegation).
Event capturing can be handy when you need parent elements to intercept actions before children.
Imagine you have a list of items that keeps growing dynamically (e.g., a to-do list app). Instead of attaching a click listener to every new item, you can attach one to the parent <ul> and let bubbling do the job.
Stopping Propagation
Sometimes, you don’t want an event to bubble or capture further. In those cases, you can use:
event.stopPropagation();
This method stops the event from moving to other ancestors.
The parent never gets triggered because we stopped propagation.
Event Delegation: Bubbling in Action
One of the coolest applications of bubbling is event delegation. Instead of attaching listeners to multiple child elements, you add just one to the parent.
Here, even if you add new <li> items dynamically, the parent <ul> will still handle their clicks. That’s the power of bubbling.
Key Differences Between Capturing and Bubbling
Feature
Event Capturing
Event Bubbling
Direction
Top → Target
Target → Top
Default Behavior
Not by default (need true)
Default in JavaScript
When to Use
Parent should catch first
Child-first, good for delegation
Best Practices
Use bubbling for most use cases since it’s the default and simplifies event delegation.
Use capturing when you need parents to handle events before children.
Always consider using stopPropagation() wisely — overusing it can break parent-child communication.
FAQs
Q1. Which is default: event bubbling or capturing? Bubbling is the default behavior in JavaScript. Capturing only happens if you enable it manually.
Q2. When should I use capturing instead of bubbling? Use capturing when you want higher-level elements (like a container or document) to handle events before the target element.
Q3. Can I disable bubbling? Yes, you can stop bubbling using event.stopPropagation().
Q4. Is event delegation always better? Not always. It’s great for dynamic elements, but for single static elements, direct listeners are fine.
Q5. Do all browsers support bubbling and capturing? Yes, all modern browsers support both phases.
Conclusion
Event bubbling and capturing might sound like abstract concepts, but they’re simply about the path an event takes in the DOM. Bubbling (child to parent) is the default and most commonly used. Capturing (parent to child) can be enabled when needed.
If you learn to control propagation and apply event delegation smartly, you’ll not only write cleaner code but also build more efficient, scalable applications.
Want to dive deeper into such JavaScript fundamentals and advanced concepts? Check out Uncodemy’s JavaScript Course to strengthen your foundation and grow your skills as a developer.
Placed Students
Our Clients
Partners
...
Uncodemy Learning Platform
Uncodemy Free Premium Features
Smart Learning System
Personalized learning paths with interactive materials and progress tracking for optimal learning experience.